The Keys to Solving Fatigue: The Silent Killer
Randy Riddell
Fatigue is a failure mode that every manufacturing plant will experience at some point and can become chronic if not solved. While understanding fatigue has advanced since its inception in the early 1800s, there are still some misunderstandings in manufacturing in solving these failures. A characteristic of fatigue failures is stress, which is typically below the yield strength of the material. This is what makes fatigue a silent killer.
Fatigue occurs on a part that is subjected to alternating or cyclic stress. Cyclic stress can cause failure after a certain number of cycles. Fatigue becomes a failure mode when cracks initiate where stresses have concentrated on the part. When solving fatigue failures, there are two key areas on which to focus the analysis: External forces that cause the cyclic stress and component design that reduces the endurance limit of the material. It is in one or both of these areas where the solution to fatigue failures can be found. So, let’s take a closer look at these two key areas.
Identify Then Reduce or Eliminate the Cyclic Stress
The first key step is correctly reading the fracture surface to determine the type of fatigue. The different types of fatigue will point to the type of stress causing the fatigue. The fatigue may be unidirectional bending, reversed bending, rotating bending, torsion, or tension. Rotating bending is one of the most common failure mechanisms for rotating equipment when fatigue fracture occurs. Torsional loads are typically constant in a combined stress application and, if variable, are typically pulsating stresses. High strength materials typically exhibit brittle fractures, while low strength materials typically exhibit ductile type fractures. The fracture plane also can help identify the type of fatigue. Most torsion failures occur at a 45° fracture plane, while bending is typically a 90° fracture plane.
The fatigue fracture may be further described as high cycle or low cycle and high stress or low stress. The size of the fast or final fracture zone compared to the fatigue area will reveal if the failure is high or low stress fatigue. The fast fracture zone is the area of the fracture that failed due to overload after some amount of fatigue had propagated on the part. The fatigue may be pure mechanical fatigue or corrosion fatigue. Corrosion fatigue drastically reduces the fatigue strength of the material. Ratchet marks on the outside of the fracture indicate fracture initiation sights. Beach marks (i.e., progression marks) show the crack’s progression history and path. The location of a crack’s origins may be a keyway corner or shaft step radius. Figure 1 shows an example of some basic fatigue features. Assistance from a metallurgical analysis lab may be needed to identify the fatigue mechanism.
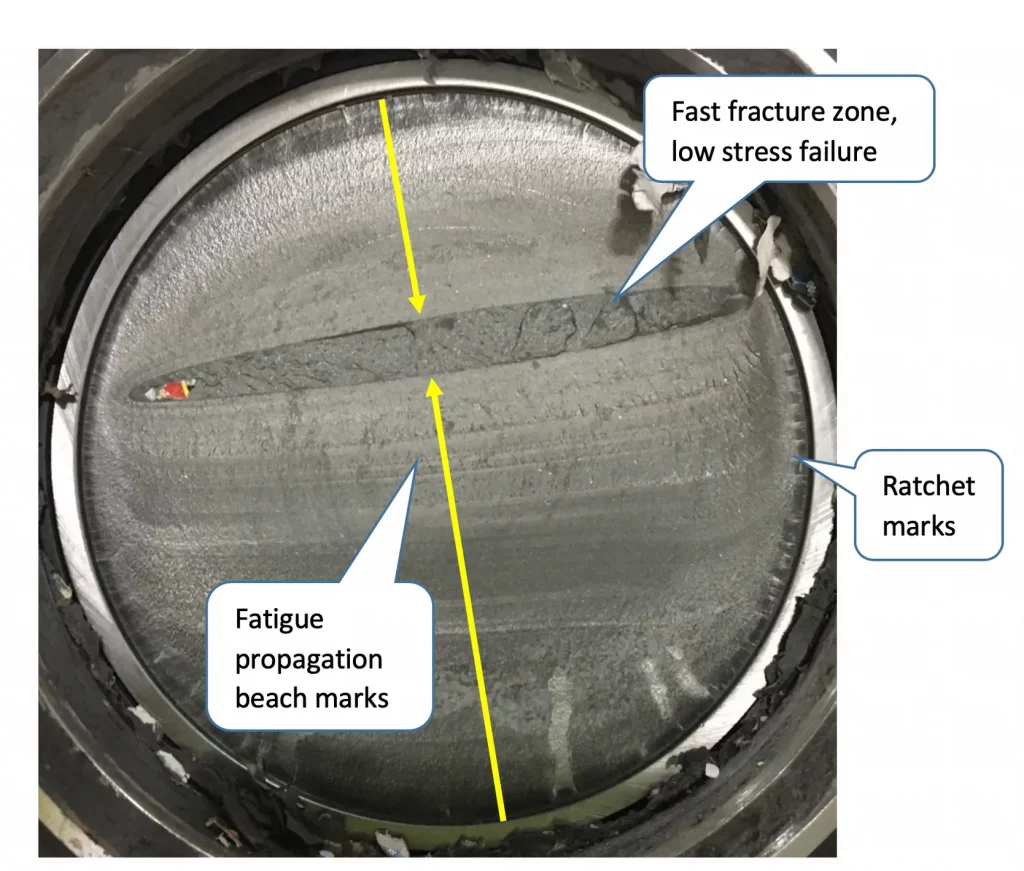
Once the type of fatigue is known, the source of the cyclic stress that matches the fatigue fracture can be located. Bending stress is one of the key types of stresses that cause fatigue failure. It can originate from reaction forces from a chain or belt drive, overhung loads, misaligned shafts, or reaction loads from equipment operation.
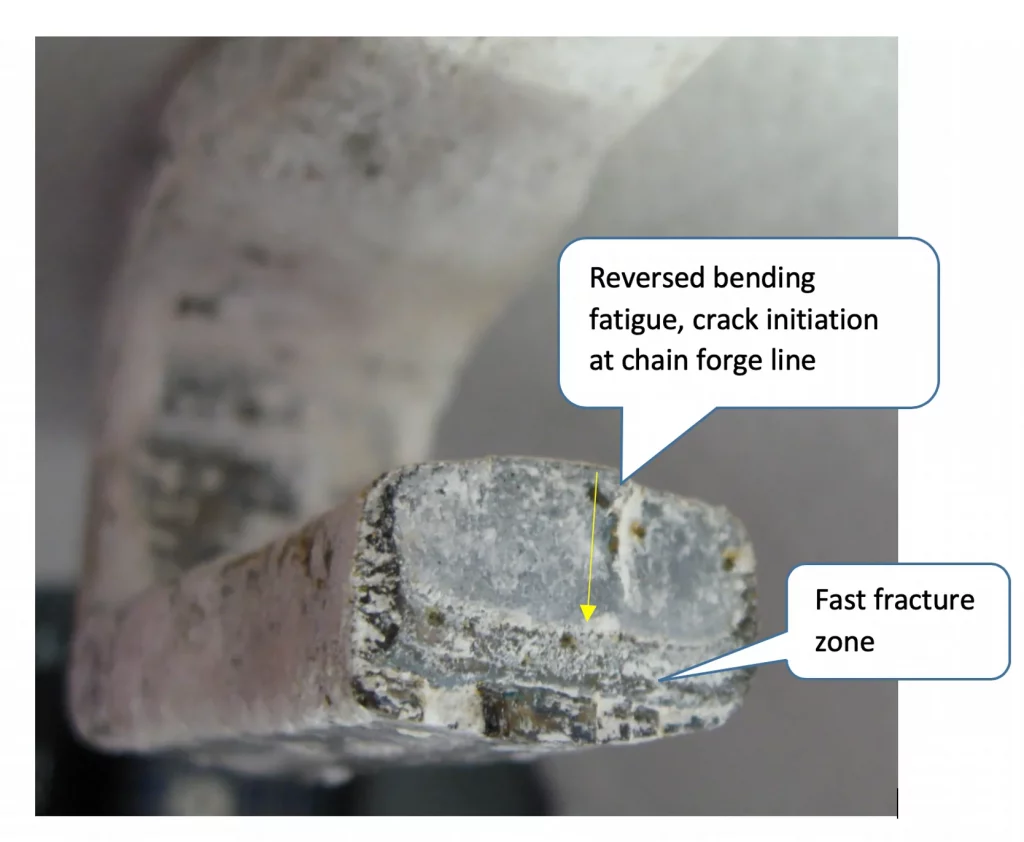
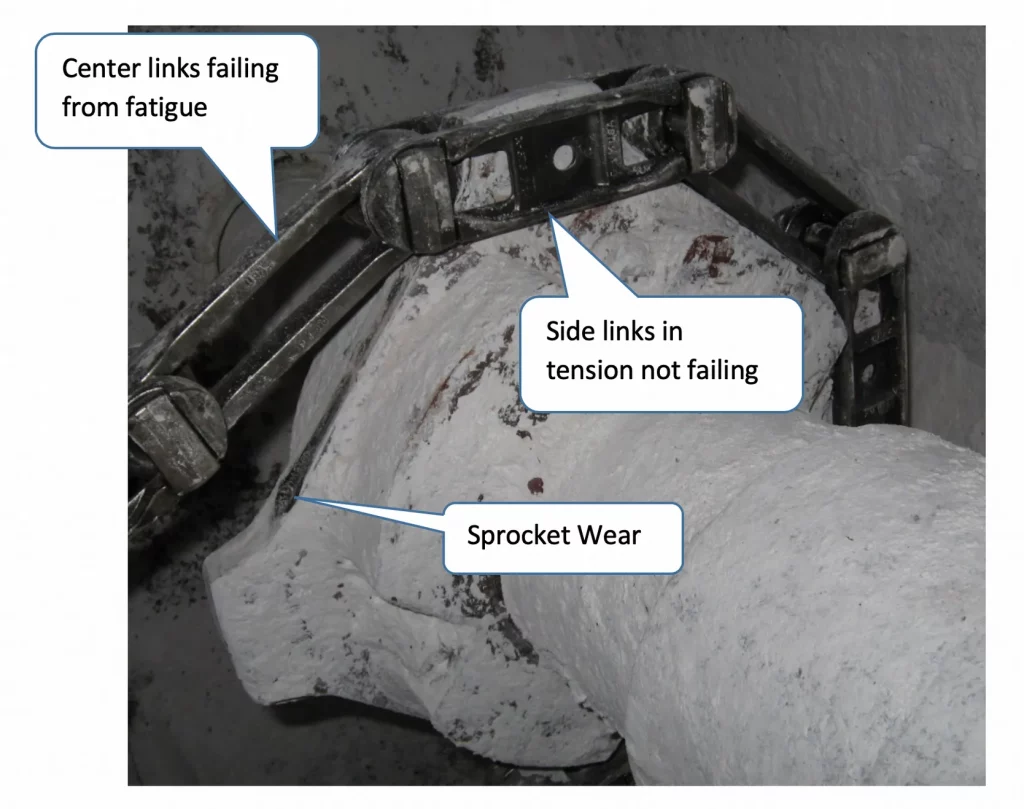
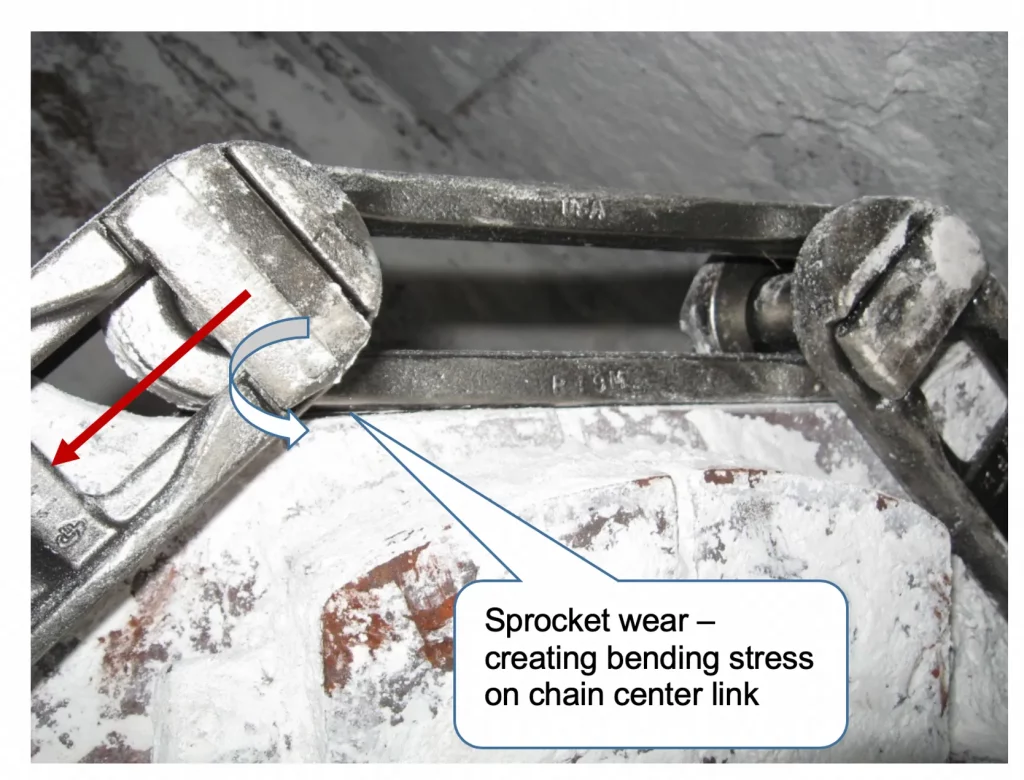
As an example, a drag chain link fatigue was identified as reversed bending fatigue. Initially different chains were installed, but with the same failures. A closer investigation showed this chronic failure was only occurring on the center link of the chain. The only area where bending stress could occur on this center link was around the sprocket. Each revolution around the sprocket tooth created a cyclic bending stress on the chain link. The cause of the cyclic stress was found to be a worn sprocket (see Figures 2 through 4). Removing the cyclic bending stress by replacing the worn sprockets removed the force initiating the fatigue. The result was a cyclic stress below the endurance limit of the material. The stress concentration at the forge line on the chain link was where the crack initiated, but removing the large cyclic stress was the root cause. However, there are other times where the cyclic stress may be reduced by precision assembly, such as proper belt/chain tension on a drive shaft.
Analysis of Component Design to Improve Endurance Limit and Reduce Fatigue Risk
In most cases, cyclic stress is just a function of normal operation and can’t be reduced or eliminated. In these cases, the solution must look at two areas: component design and flaw elimination. A focused analysis of the fatigue crack initiation location on the component may yield additional actions to insulate against future fatigue failures.
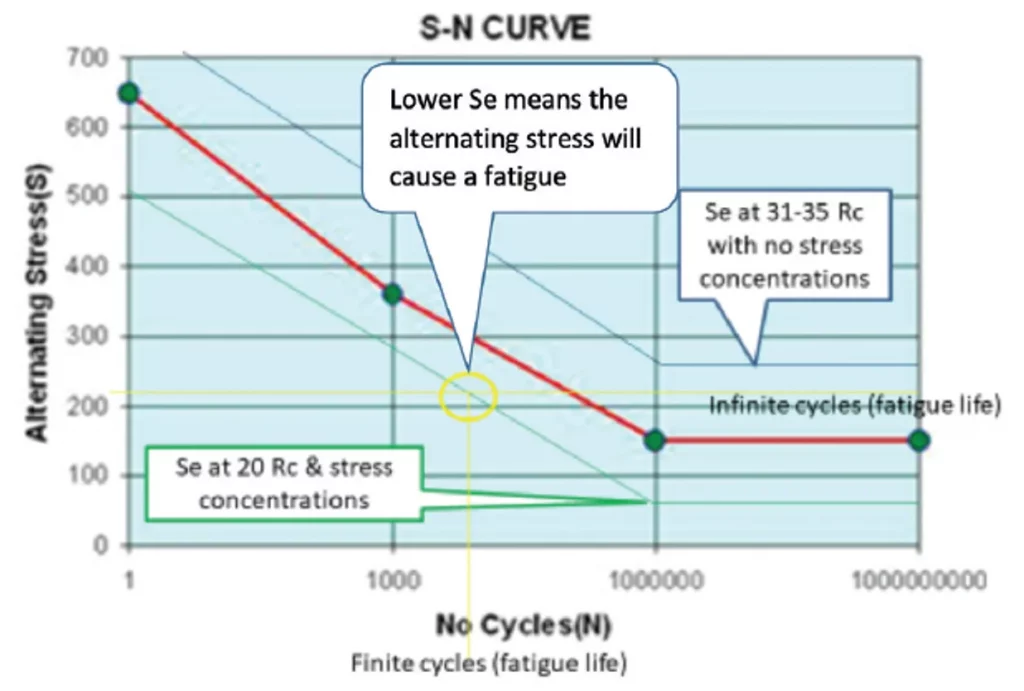
Component design starts with the material. The material is critical to understanding the fatigue resistance of the component. The endurance limit is the stress level at which a part can withstand a cyclic stress without a fatigue failure. A part’s design, where the cyclic stress is lower than the endurance limit, will eliminate fatigue failure for the life of the part. The S-N curve in Figure 5 shows how the endurance limit of a component’s design can lead to infinite life and how a reduction in the endurance limit may lead to a finite fatigue life of a machine’s component. Design flaws lower the endurance limit to a point where a finite or certain number of cycles will lead to a fatigue failure.
The endurance limit of the material is directly proportional to the material tensile strength.
Se’ = .504 Sut
Where Sut = Ultimate tensile strength of material
Se’ = Endurance limit of test specimen
The basic concept is simple, however, the endurance limit can be reduced by many design factors, such as surface, size, load and temperature, as well as miscellaneous factors, like notch stress concentration, shaft radius and corrosion. These corrections may be applied to find the corrected endurance limit as shown:
Se = Se’KaKbKcKdKeKr
Where Se = Endurance limit of mechanical element
Se’ = Endurance limit of test specimen
Ka = Surface factor
Kb = Size factor
Kc = Load factor
Kd = Temperature factor
Ke = Miscellaneous factors
Kr = Reliability factor
The highest stress is typically at the surface of the material, so this is a key area to focus on. The surface factor can drastically reduce the endurance limit. Many times, the surface finish or surface defect will be what localizes a cyclic stress that initiates fatigue. A general rule is to have a surface with no more than a 32 roughness average (Ra), which would keep the surface factor, Ka, in the .85 to .9 range for most mild steels. Surface roughness increases from 32 Ra to 250 Ra can reduce the endurance limit by 25 percent.
Not only is the material strength of primary importance, but the material will also have very different machining characteristics that can lead to machine toolmarks and stress concentrations. Fine grain materials also typically yield more fatigue resistance than coarse grain material. More grain boundaries can impede crack propagation. Material toughness is also a factor to consider with material selection. Toughness is the area under the stress strain curve and is defined as the energy per unit volume prior to fracture. Material toughness allows the material to absorb the stress energy. Medium carbon steels have the highest toughness when compared to high carbon and low carbon steels.
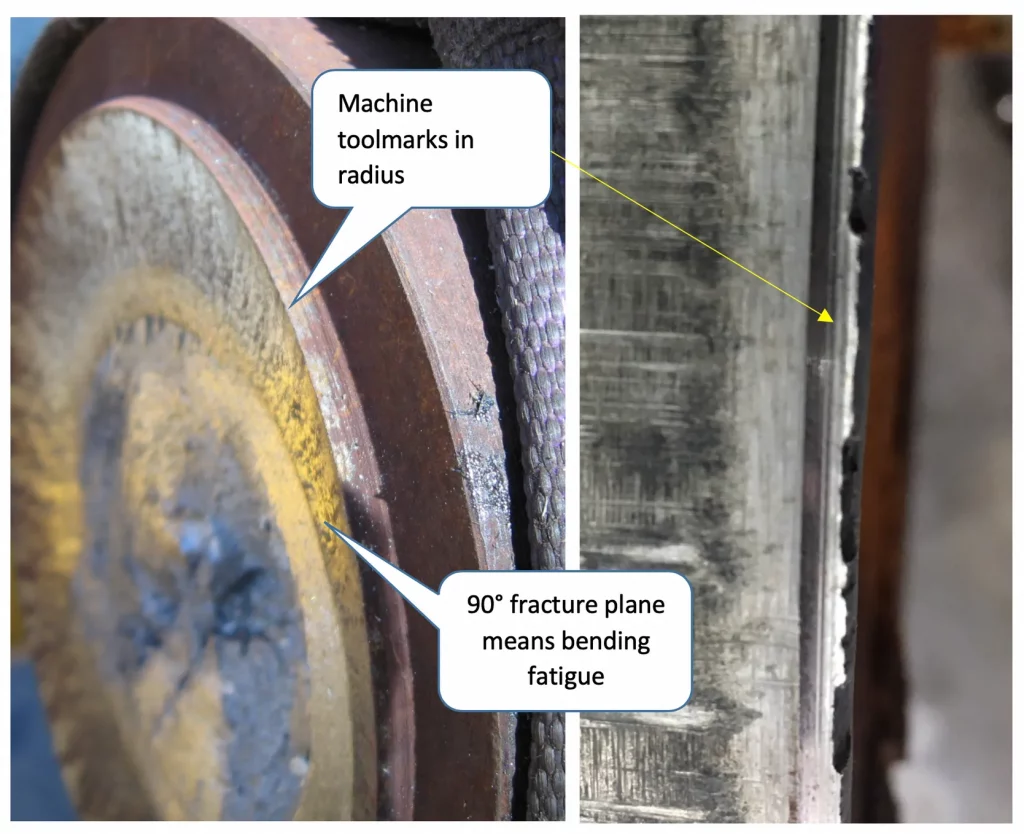
An example of the effects of surface factors would be a typical rotating bending fatigue on a shaft like that in Figure 6. Machine toolmarks on the already small shaft radius increased the shaft stress concentration, which initiated a rotating bending fatigue failure.
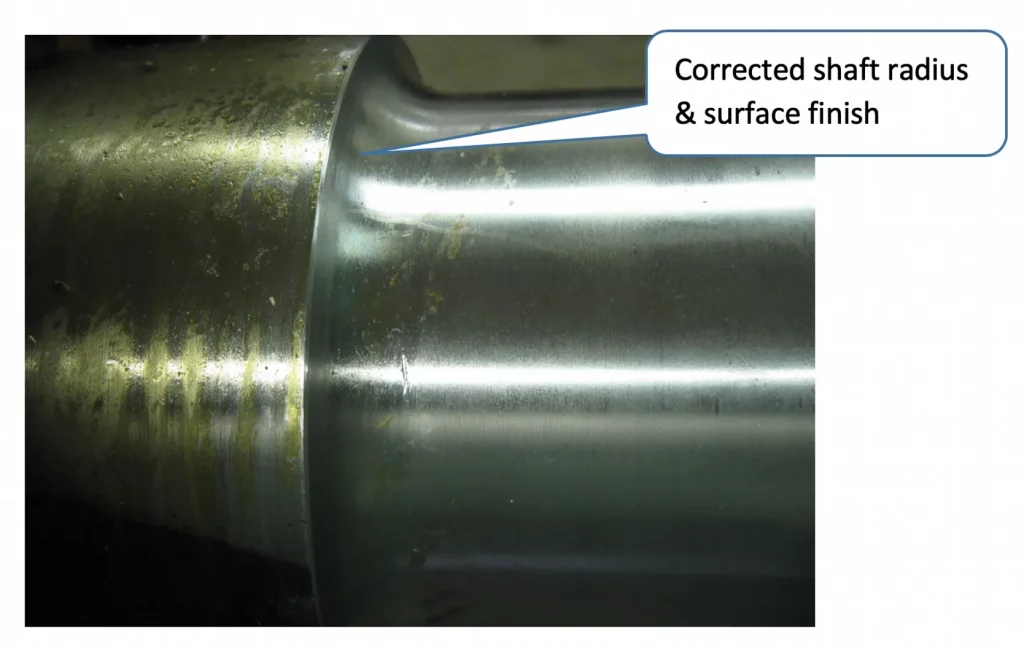
Due to the surface factor being one of the most important fatigue design and manufacturing elements, there are many surface treatments that can insulate surfaces from cyclic stress and fatigue crack initiation. Many of these induce a compressive surface stress at some case depth. The surface tensile stress on the part must overcome the surface compressive stress before the part sees a cyclic fatigue stress. Some of these include carburizing, nitriding, or shot peening. Electropolishing provides a super smooth finish that improves the surface factor, but it removes some material from the part. Electroplating can reduce the endurance limit as hydrogen embrittlement is a concern.
For many systems, there is little that can be done to reduce the cyclic stress for normal operation. Increasing the part size will also reduce the cyclic stress on the part without having to reduce the cyclic force. For temperature, many mild steels will have little impact up to 400° F, but can be significant with temperatures approaching 1,000° F.
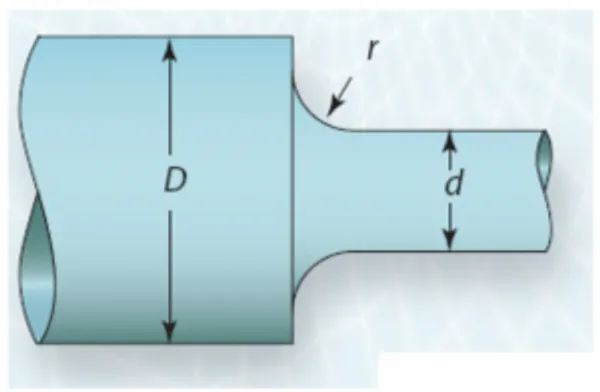
Changing the stress concentration, such as increasing the shaft radius, will reduce the fatigue stress induced on the component. Most standards do not provide details on what is a reasonable shaft radius. Without doing detailed calculations, use as large of a shaft radius as the design will allow. Some general guidelines for shaft radius are similar to those shown in Figure 8.
For a shaft with D/d>1.2, the r/d> .1
For a shaft with D/d<1.2, the r/d> .05
Fatigue failure doesn’t have to stay a mystery or become chronic in your plant. By focusing on the two key areas of reducing cyclic stress and improving the endurance limit, fatigue can be solved.

Randy Riddell
Randy Riddell, CMRP, PSAP, CLS, is the Reliability Manager for Essity at the Barton Mill in Alabama. Randy has over 30 years of industrial experience with a career focused on equipment reliability. www.essity.com
Related Articles
Analyzing Semiconductor Failure

Improvement: What Comes First?

An Integrated Process for System Maintenance, Fault Diagnosis and Support

Anatomy of a Boiler Failure—A Different Perspective
Anatomy of a Hydraulic Pump Failure

Are We Willing to Hear What “Failure” Has to Say?


