Understanding Shaft Alignment: Basics
Rich Henry, Ron Sullivan, John Walden and Dave Zdrojewski, VibrAlign, Inc.
This is a 4 part series, click to view each part: 1 : 2 : 3 : 4
Part one of a four-part series that will cover shaft alignment fundamentals and thermal growth, and highlight the importance of field measurements through two case studies.
Despite the best efforts to precisely align rotating machinery shafts, dynamic movement (commonly believed to be due to the thermal growth of the machine casings) has resulted in machines operating at less than optimum alignment conditions. This vexing problem has plagued machine reliability professionals for decades.
What is shaft alignment?
Shaft alignment is the positioning of the rotational centers of two or more shafts such that they are co-linear when the machines are under normal operating conditions. Proper shaft alignment is not dictated by the total indicator reading (TIR) of the coupling hubs or the shafts, but rather by the proper centers of rotation of the shaft supporting members (the machine bearings).
There are two components of misalignment—angular and offset.
Offset misalignment, sometimes referred to as parallel misalignment, is the distance between the shaft centers of rotation measured at the plane of power transmission. This is typically measured at the coupling center. The units for this measurement are mils (where 1 mil = 0.001 in.).
Angular misalignment, sometimes referred to as “gap” or “face,” is the difference in the slope of one shaft, usually the moveable machine, as compared to the slope of the shaft of the other machine, usually the stationary machine. The units for this measurement are comparable to the measurement of the slope of a roof (i.e., rise/run). In this case the rise is measured in mils and the run (distance along the shaft) is measured in inches. The units for angular misalignment are mils/1 in.
As stated, there are two separate alignment conditions that require correction. There are also two planes of potential misalignment—the horizontal plane (side to side) and the vertical plane (up and down). Each alignment plane has offset and angular components, so there are actually four alignment parameters to be measured and corrected. They are horizontal angularity (HA), horizontal offset (HO), vertical angularity (VA), and vertical offset (VO).
Shaft alignment tolerances
Historically, shaft alignment tolerances have been governed by the coupling manufacturers’ design specifications. The original function of a flexible coupling was to accommodate the small amounts of shaft misalignment remaining after the completion of a shaft alignment using a straight edge or feeler gauges. Some coupling manufacturers have designed their couplings to withstand the forces resulting from as much as 3 degrees of angular misalignment and 0.075 in. (75 mils) of offset misalignment, depending on the manufacturer and style of the coupling.
Another common tolerance from coupling manufacturers is the gap tolerance. Typically this value is given as an absolute value of coupling face TIR (as an example, a specification migh read “face TIR not to exceed 0.005 in.”). This number can be deceiving depending on the swing diameter of the face dial indicator or the diameter of the coupling being measured. In fairness, it should be noted that the tolerances offered by coupling manufacturers are to ensure the life of the coupling with the expectation that the flexible element will fail rather than a critical machine component.
If this angular tolerance was applied to a 5 in. diam coupling, the angular alignment result would be 1 mil/1 in. of coupling diameter or 1 mil of rise per 1 in. of distance axially along the shaft centerline. If the coupling was 10 in. in diameter, the result of the alignment would be twice as precise (0.5 mil/1 in.). This would lead one to conclude that an angular alignment tolerance based on mils/1 in. would be something that could be applied to all shafts regardless of the coupling diameter.
Harmonic forces are dangerous
When shafts are misaligned, forces are generated. These forces can produce great stresses on the rotating and stationary components. While it is probably true that the coupling will not fail when exposed to the large stresses as a result of this gross misalignment, the bearings and seals on the machines that are misaligned will most certainly fail under these conditions. Typically, machine bearings and seals have small internal clearances and are the recipient of these harmonic forces, not unlike constant hammering.
Excessive shaft misalignment, say greater than 2 mils for a 3600 rpm machine under normal operating conditions, can generate large forces that are applied directly to the machine bearings and cause excessive fatigue and wear of the shaft seals. In extreme cases of shaft misalignment, the bending stresses applied to the shaft will cause the shaft to fracture and break.
Bearing life expectancy
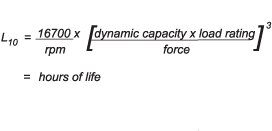
The most prevalent bearings used in machinery, ball and roller bearings, all have a calculated life expectancy, sometimes called the bearing’s L-10 life— a rating of fatigue life for a specific bearing. Statistical analysis of bearing life relative to forces applied to the bearings has netted an equation (see “How Bearing Life is Affected by Misalignment”) describing how a bearing’s life is affected by increased forces due to misalignment.
As the force applied to a given bearing increases, the life expectancy decreases by the cube of that change. For instance, if the amount of force as a result of misalignment increases by a factor of 3, the life expectancy of the machine’s bearings decreases by a factor of 27.
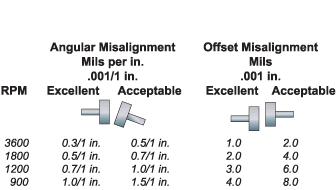
Quite a bit of research in shaft alignment has been conducted over the past 20 years. The results have led to a much different method of evaluating the quality of a shaft alignment and to increasingly accurate methods of correcting misaligned conditions. Based on the research and actual industrial machine evaluations, shaft alignment tolerances are now more commonly based on shaft rpm rather than shaft diameter or coupling manufacturers’ specifications. There are presently no specific tolerance standards published by ISO or ANSI, but typical tolerances for alignment are shown in the table “Typical Tolerances for Alignment.”
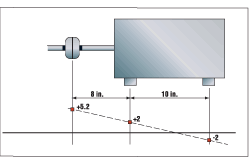
Another common method of determining shaft alignment tolerances is to ensure the machine feet are within a specified distance from what is considered “zero”. This method also can be misleading. If a machine is considered to be aligned when the foot corrections are less than 2 mils at both the front feet and back feet, serious misalignment can sometimes be present. As a general rule, the smaller the machine footprint (distance from front feet to back feet), the worse the alignment condition based on these criteria for alignment tolerance.
In Fig. 1, the motor foot distance front to back is 10 inches. The distance from the front feet to the center of the coupling is 8 inches. If the front foot of the motor is left 2 mils high and the back feet are left 2 mils low, the shaft alignment results will be as follows: vertical angularity of 0.4 mil/1 in. open at the top of the coupling, and a vertical offset of 5.2 mils high at the plane of power transmission. If this machine operates at 1800 rpm, it would be outside the acceptable shaft alignment tolerances. Again, this reinforces that a set of shaft alignment tolerances based on shaft rpm would apply to all machines regardless of their footprint. MT
How Bearing Life Is Affected By Misalignment

Formula notes: This formulation is credited to the work done by Lundberg and Palmgren in the 1940s and 1950s through empirical research for benchmarking probable fatigue life between bearing sizes and designs.For ball bearings: L10 = (C/P)3 x 106; For roller bearings: L10 = (C/P)10/3 x 106where:
L10 represents the rating fatigue life with a reliability of 90 percent
C is the basic dynamic load rating—the load which will give a life of 1 million revolutions which can be found in bearing catalogs
P is the dynamic equivalent load applied to the bearing
Typical Tolerances For Alignment

Misalignment Using Machine Feet Distances

This is a 4 part series, click to view each part: 1 : 2 : 3 : 4
Rich Henry, Ron Sullivan, John Walden and Dave Zdrojewski, VibrAlign, Inc.
Related Articles

Understanding Shaft Alignment: Thermal Growth

Determining Accurate Alignment Targets

Leaky Shaft Seals


