Visual Inspection: A Necessary Component of Infrared Inspections
- The infrared inspection: The reason for performing this type of survey is to find electrical problems so maintenance personnel can repair them before failure and/or damage to the component and the resulting downtime. Many times, critical problems are obvious and other times they are not so obvious without some due diligence.
- The visual inspection: Visual inspection can be just as important as infrared. There are many things visually that can’t be detected with infrared as the examples in this article demonstrate.
It may seem that visual inspection goes beyond what thermographers are hired to do, but conscientious thermographers include notes and even images in their reports when they see code violations, broken equipment, incorrectly sized fuses, bad wiring, etc. A good thermographer will not ignore copper tubing used as a fuse (Figure 1), even if it looks fine in the infrared. Whether the inspection is insurance driven or a proactive stance, an infrared inspection and a visual inspection complement each other.
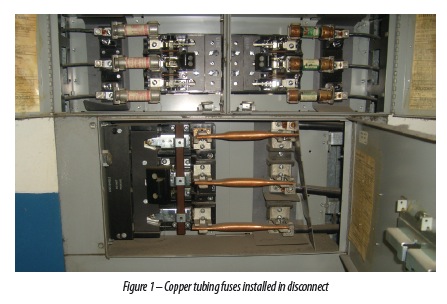
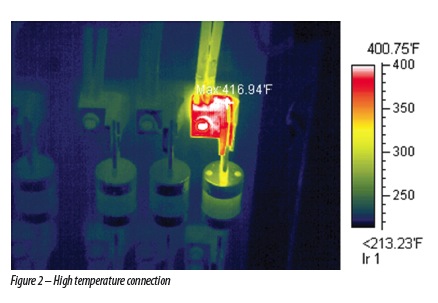
Figure 2 is an extreme case of high temperature, but not at all uncommon. In a case like this, when the cabinet is opened, the thermographer sees the problem using the IR camera, but also can often see the tell-tale signs of the problem visually by the damage from excessive heating.
Finding critical problems with large temperature differentials is easy for just about any thermographer as they show up visually on the IR camera’s screen. But what about the smell of burned insulation on wiring or the sound of a squealing bearing, belt, or corona on high voltage lines? These are all indications of problems that are not necessarily hot at the time of the IR survey, but could all cause failures if left unreported with no follow up.
Faults need to be found in early stages of failure before damage has occurred and before total failure. This infrared technique is predicated on the fact that there is a locked relationship between temperature [rise] and an increased chance of failure. Electrical (and mechanical) problems in this stage often show very little temperature rise. It takes an experienced thermographer with a good piece of infrared equipment to find and document problems in early stages. In other words, anybody can see burning hot things with an IR camera, but low temperature anomalies and even ambient temperature objects can be critical problems as well.
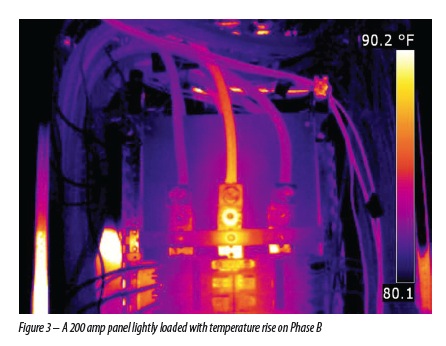
For example, a small rise in temperature often indicates a low priority problem when scheduling for repair. But small rises in temperature can also indicate critical problems. As shown in Figure 3, the 200 amp panel had a small temperature rise on Phase B, which typically would not be that interesting; perhaps a slight load imbalance. But the load readings showed only 6 amps per phase, no imbalance and instead a faulty connection and probably a very bad one since this is a single digit percentage of rated load. If this panel is loaded to 100 amps or more, the temperature rise of this fault would increase exponentially and could result in a catastrophic failure.
It is smart to visually inspect the electrical switchgear while an infrared inspection is in progress. During inspections I have conducted over the years, I was asked many times by corporate environmental health and safety officers, maintenance managers, facility engineers and plant managers to please note any electrical hazards or deficiencies that I was able to identify.
Examples found:
- Improperly fused disconnects (Figure 1)
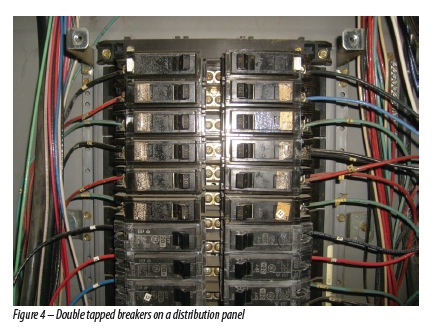
- Panel breakers double tapped (Figure 4)
- Inoperable disconnects
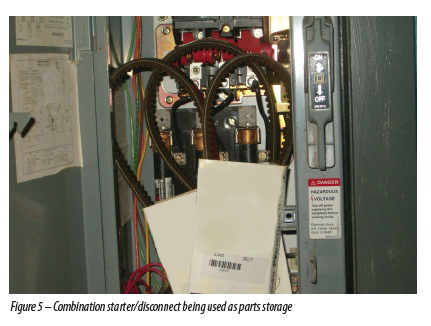
- Disconnects and combination starters used as parts storage (Figure 5)
- Flexible conduit pulled out of box exposing conductors
- Exposed energized parts
- Fuses not installed or engaged properly
- Blown fuses
As thermographers, we find many problems through the use of thermal imaging. Large temperature differences are common and make beautiful images. Small temperature differences are typically low priority, but also can indicate critical problems under different load conditions. On the other hand, the value of visual inspection is often overlooked. Think outside the [thermal] box and take advantage of the visual inspection component of thermal surveys – it is in the best interest of all parties involved. In most instances, the thermographic report and visual inspection are documented separately. There may be several reasons for this, but ultimately, if you can identify and document a problem or potential problem with infrared or visual inspection, your proactive dollars have been well spent.

Jeffrey Gadd
Jeffrey Gadd is a Level II Thermographer and Owner of Vision Infrared Services in Cleveland, Ohio. Jeff is also President and Founder of Professional Infrared Network (PIN).
Related Articles
Analyzing Mechanical Systems Using Infrared Thermal Imaging
Gearbox Diagnostics Fault Detection
What is a Shaft Centerline Diagram?

Outsourced Condition Monitoring Services
Hydraulic Filter Condition Monitoring

