Integrating Vibration and Wear Debris Analysis for Machine Condition Monitoring
Nicole J. Kessissoglou and Zhongxiao Peng, School of Engineering, James Cook University, Practicing Oil Analysis Magazine.
It has long been accepted that condition based maintenance is the most effective and cost-efficient approach to maximizing the life of industrial machinery. Vibration and wear debris analyses are two key components of any successful condition-monitoring program and can be used as both predictive and proactive tools to identify active machine wear and diagnose faults occurring inside machinery. When these techniques are conducted independently, only a portion of machine faults are typically diagnosed. However, practical experience has shown that integrating these two techniques in a machine condition monitoring program provides greater and more reliable information, bringing significant cost benefits to industry.
Vibration analysis in particular is becoming increasingly popular as a predictive maintenance procedure and as a support for machinery maintenance decisions. As a general rule, machines do not break down or fail without some form of warning, which is indicated by an increased vibration level. By measuring and analyzing the vibration of a machine, it is possible to determine both the nature and severity of the defect, and hence predict the machine’s failure. The overall vibration signal from a machine is contributed from many components and structures to which it may be coupled. However, mechanical defects produce characteristic vibrations at different frequencies, which can be related to specific machine fault conditions. By analyzing the time and frequency spectrums and using signal processing techniques, both the defect and natural frequencies of the various structural components can be identified.
Practitioners of oil analysis are familiar with the practice and advantages of oil wear debris analysis. Compared to vibration analysis, oil and particle analysis have certain advantages, as they can provide direct and early information on wear modes and the machine’s condition. In fact, in many instances it has been proven to be a leading indicator of active machine wear, compared to vibration analysis. In addition, oil analysis has certain advantages in monitoring low-speed machinery (less than 5 rpm), where it is usually difficult to apply vibration analysis techniques. However, wear debris analysis cannot effectively uncover all manners of failure mechanisms on its own. For this reason, both oil analysis and vibration analysis are necessary and vital parts to an effective program.
Both wear debris analysis and vibration analysis are complicated in terms of their analysis requirements, and the demand of human expertise and experience. Experts in the two fields are often isolated from each other. Hence, effective integration of the two condition-monitoring techniques can be challenging in a working environment, especially for remote industries such as offshore drilling, mine sites and other isolated operations. In recent years, research toward this goal has been conducted, but with limited achievement. However, advances in technological innovation, including artificial intelligence and advanced computer analysis techniques, have created renewed optimism at the prospects of overcoming these obstacles to develop a new integrated approach to machine condition monitoring.
Integrating Vibration Analysis and Wear Debris Analysis
A Test Case To investigate the effectiveness of integrating both vibration analysis and wear debris analysis, researchers at the School of Engineering at James Cook University in Australia recently conducted a study that investigated the correlation of vibration analysis and wear debris analysis. An experimental test rig was constructed consisting of a worm gearbox driven by an electric motor. A series of studies was conducted on the gearbox test rig whereby a number of different machine defect conditions were introduced under controlled operating conditions. Numerical data provided by wear debris analysis was then compared with vibration analysis spectra in an attempt to quantify the effectiveness of both vibration analysis and wear debris analysis in predicting and diagnosing machine failures.
Multiple wear debris analysis techniques, including a high-quality particle analyzer, confocal laser scanning microscope (CLSM) and electron probe microanalyzer, were used to provide reliable and objective data for this study. Three tests were conducted under the following conditions:
- normal operation
- lack of proper lubrication, and
- with the presence of contaminant particles added to the lubricating oil.
In each case, oil samples and vibration data were collected regularly. Wear debris analysis included the study of particle concentration and size distributions, along with the examination of particle morphology and types to determine possible wear mechanisms, wear rates and wear sources. Vibration analysis consisted of analyzing both the time and frequency vibration signals from the test rig to determine the onset and severity of active wear, and to help diagnose the root cause.
The choice of a worm gear for this study was deliberate. Because both rolling and/or sliding wear processes are common in industrial rotating equipment, the research team wanted to replicate both types of mechanical friction in one experimental test rig.
The worm gearbox that was selected had a reduction ratio of 1:28 and was driven by a four-pole electric motor with a rated power of 0.37 kW and a rotational speed of 1,488 rpm. The worm shaft was made of case hardened alloy steel with ground-finished teeth while the worm pinion was made of shell-cast high-strength phosphor bronze. The worm gear was case harden to a depth of 0.2 mm with a Rockwell hardness of C58/60. The surface was finished to within 0.8 mm.
The surface of the pinion gear was machine finished and softer than that of the worm gear. A paddle was installed directly to the output shaft of the gearbox to provide loading by agitating water within a reservoir tank.
The operating conditions of the worm gearbox, including motor driving speed, gearbox output speed, current drawn by the motor, and ambient temperature, were determined before experiments were carried out. Two types of lubricants were used to carry out three tests in this project. In the first test, an ISO VG 320 cSt PAG-based oil specifically recommended for this application was used to lubricate the gear box working under a normal operating condition. Test No. 1 provided the control for the experiment, using the proper lubricant in a clean reservoir.
After Test No. 1 was complete, a general purpose, ISO VG 68 cSt mineral oil with no specific antiwear or EP additives was used to create a special operating condition of the gearbox corresponding to inadequate lubrication. In Test No. 3, Trivela 320 cSt oil was used again, however, NC100 iron powder (contaminant particles) were added. NC100 iron powder is one of the most widely used iron powders in the powder metallurgy industry.
For Test No. 1 and Test No. 2, the gearbox ran for one week (168 hours) before the first oil sample and vibration measurements were taken. Subsequent oil samples and vibration measurements were then taken on a weekly basis. No oil change was made during these two tests. Test No. 1 and Test No. 2 were each conducted over a four-week period. Test No. 3 was conducted over a 10-week period, during which the oil sampling and vibration measurements were taken weekly. In Test No. 3, the oil was changed at the end of weeks one, three, six and 10. After each oil change, the gearbox was thoroughly cleaned. Then, new lubricating oil was used in the gearbox, and 0.3 g NC100 iron powder was added to the oil immediately after the gearbox was restarted.
The worm-drive lubricant reservoir used in these tests was small and highly confined. This resulted in good particle and lubricant mixing during machine operating, thus providing oil samples representative of particles circulating through the gear mesh.
Wear Debris and Vibration Analysis Results An oil sample was collected each week from the three tests over a period of 18 weeks. Each oil sample was carefully examined and compared. A particle analyzer was used to determine oil sample particle concentrations to assess the general trend of the gearbox conditions. Wear debris generated from the tests was separated from the oil samples and fixed to glass slides using the filtergram method. The particles on the slides were examined using a standard optical microscope and then studied quantitatively using computer-assisted image analysis techniques and a confocal laser scanning microscope (CLSM). Particle type, overall surface characteristics and color were studied using the optical microscope.
The CLSM can acquire a sequence of images at varying depths. An appropriate 3-D image of a particle can be constructed by compiling the sequence of 2-D images to present the surface morphology of the particle in 3-D. Both boundary and surface definitions of the particles were obtained using the CLSM. The surface roughness (Ra) is a numerical parameter used to describe the surface roughness of the particles. In this study, Ra was obtained through the measurement of height-encoded images of wear particles, which is different from standard Ra measurements using a standard profilometer. Constant laser intensity was used to obtain all the images to measure Ra for comparison.
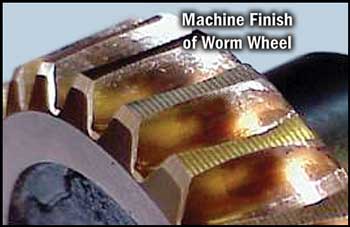
Test No. 1 – Correct Lubrication – Experimental Control Test Wear Debris Analysis ISO VG 320 cSt specifically recommended for this application was used in the first test on a new worm gear box. The new surface finishes of the worm and pinion gears are shown in Figures 1a and 1b. In Test No. 1, four slides were made from oil samples collected weekly for four weeks. Oil collected throughout Test No. 1 was clean and light in color. The number of particles generated from the test continuously decreased from slide one to slide four, indicating the gear box went through a running-in period and the wear rates decreased over the testing period.

Three major types of wear particles corresponding to rubbing, cutting and laminar wear were found in the oil sample on the first slide. From their color, it was evident that the majority of the cutting particles came from the softer surface, the pinion gear, which is to be expected from a normal gearbox run-in period. Both the pinion gear and worm gear generated small rubbing and laminar particles. Fewer particles were found in slide two and the decrease was due to fewer cutting particles. This indicates there was an appropriate lubrication layer existing between the two gear surfaces, and the wear process was stabilized during the test. Table 1 shows analyzed results of Test No. 1.

Vibration Analysis
Vibration measurements were taken at the drive end of the motor, the drive and non-drive ends of the worm gear’s shaft, and at the drive end of the pinion. In the first test, the gearbox was in operation for only a short time, and was relatively wear free. The velocity-frequency spectrum of the worm shaft nondrive end (free end) showed two dominant frequencies corresponding to the shaft speed (24.7 Hz) and twice line frequency (100 Hz). The peak at twice line frequency represents an electrical fault within the motor, and is not related to any indications of wear in the worm gear. Examination of both the time and frequency domain plots recorded over the duration of Test No. 1 indicated that the gearbox was operating with minimal wear. As time progressed, the peak at the shaft speed dramatically decreased. This was attributed to a reduction in wear due to the gearbox’s running-in period.
Test No. 2 – Impact of Inadequate Lubrication
Wear Debris Analysis
In Test No. 2 the OEM recommended oil was replaced with a general purpose ISO VG 68 cSt oil containing no specific AW or EP additive. This oil was used to create inadequate lubrication of the gearbox. To avoid possible cross-contamination and compatibility issues, the gear box was thoroughly cleaned and flushed. Oil samples were again collected on a weekly basis over four weeks. Careful examination of Test No. 2 slides revealed that five types of wear particles – rubbing, cutting, laminar, sliding and fatigue particles – were present on all slides. An example of the particles from Test No. 2 is shown in Figure 2.
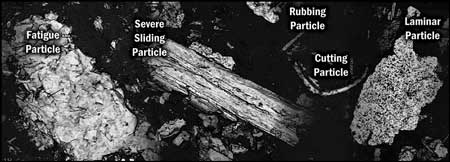
Because the viscosity of the test oil was too low, and no wear prevention additives were present to counteract the effects of boundary lubrication conditions, a large quantity of wear debris was found on each slide.
The pinion gear has a soft surface, and based on ferrographic analysis, it was discovered that both two- and three-body wear occurred inside the gearbox. The general shape of the cutting particles grew longer from slide one to slide three, indicating increasing wear severity through the duration of the test. A decrease in particle size and number on slide four indicates the wear-in stage was complete and the surfaces were smoothed. Due to the “machining” process, many particles on slide four have a straight or regular edge. A measurement of the particles’ surface roughness was conducted to monitor change in the gears’ surfaces. Following the trend described above, the particles’ surfaces became rougher from slide one to slide three, and then smoother in slide four. The results of Test No. 2 wear debris analysis are shown in Table 1.
Significant sliding particles were found in the oil samples from Test No. 2. Sliding particles usually indicate that there is a breakdown of the shear mixed layer. The sliding particles constantly decreased in size during Test No. 2, indicating that during the wear-in stage there was a lubrication problem that caused a significant amount of metal-to-metal contact. Substantial surface sliding contact broke away particles, and gradually smoothed the surface until the particle size was greatly reduced. Post-test inspection of the gear surfaces confirmed this diagnosis.
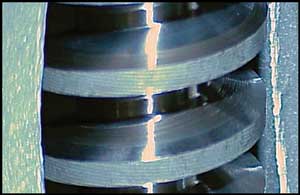
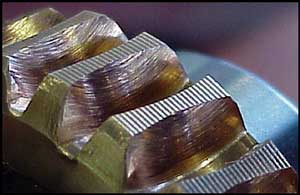
Figure 3 shows pictures of the gears after Test No. 2. Significant wear is shown on the pinion gear in Figure 3b compared to its new surface in Figure 1b. There was a large amount of surface wear in the pinion gear, which was abnormal for the short testing time. Scratches caused from the worm gear’s contact with the pinion were evident. This indicates sliding and abrasion caused by high levels of metal-to-metal contact due to inadequate lubrication breakdown.
Vibration Analysis
The test conditions used in Test No. 2 were specifically designed to create an inadequate lubrication condition. As time progressed during this test, the peaks’ energy levels increased. A worm gear does not usually wear to this degree with fewer than 1,000 hours of operation, especially when it is made of hardened steel and the pinion gear is made of soft bronze. However, the pre- and post-inspection of the pinion gear in Figures 1b and 3b, respectively, show significant surface wear. A developing bearing defect was consistent with inadequate lubrication, resulting in an increase in metal-to-metal contact and formation of scratches along the direction of contact between the worm and pinion gears.
Test No. 3 – Impact of Contaminant Particles
Wear Debris Analysis
The gearbox was thoroughly cleaned and refilled with the Trivela 320 cSt oil after the second test was completed. Contaminant iron particles were added to the lubricating oil for Test No. 3 to simulate the effects of excessive particle contamination on gear wear. Oil samples were taken weekly for 10 weeks. Table 1 shows Test No. 3 analysis results.
The test generated two major types of wear particles – rubbing particles and laminar particles. The particles in Test No. 3 were slightly larger than those in Test No. 1. In addition, the number of particles generated in Test No. 3 was much higher than the number in Test No. 1. Both of these results indicate that the condition of the gearbox was getting worse. Most particles from Test No. 3 had a relatively smooth surface, and almost no contaminant iron particles were recognized when examining their surface and boundary morphology. …
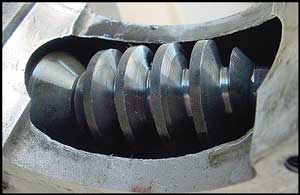
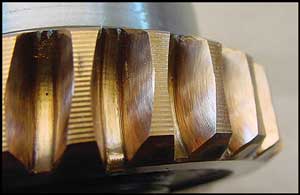
…Composition analysis using an electron probe microanalyzer identified that the iron particles added to the oil were present in the steel wear particles originating from the worm gear, indicating a high level of abrasive wear and material transfer, consistent with three-body abrasion. Due to the comparatively low hardness of the iron particles compared to the surface of the worm gear, the effects of the iron particles on the wear process are different from that of hard contaminants such as sand. As a result, significant amounts of cutting particles were not generated, and surfaces of both the gears and wear debris were relatively smooth due to rubbing wear. Post-test inspection of gear surfaces confirmed the outcomes of the wear test using the iron particles. Figures 4a and 4b show the worn surfaces of the gears after Test No. 3.
Vibration Analysis
During Test No. 3, the vibration amplitudes significantly increased at the shaft running speed, indicating an increase in wear.
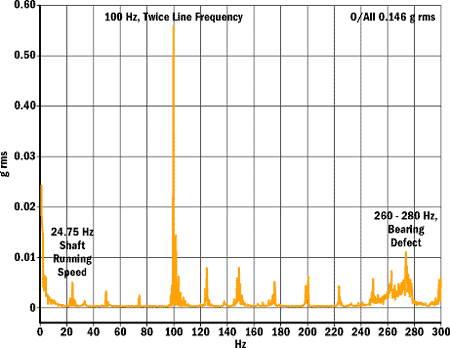
Figure 5 shows a narrowband region of increasing energy content around 260 Hz to 280 Hz. This region represents the bearing defect, and the mound of energy indicates increased wear. The developing bearing defect is also suggested by examining the demodulated signal in Figure 6.
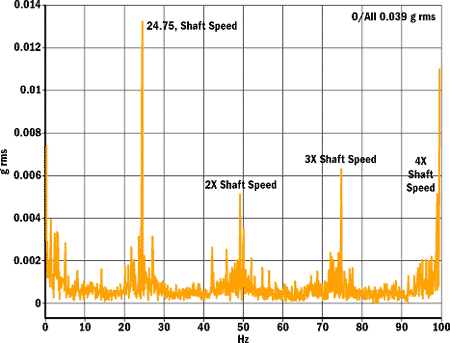
In this figure, shaft running speed harmonics indicates looseness, which may be a result of further bearing degradation. Again, vibration data is consistent with both the wear debris analysis and post-test visual inspections.
Correlation of Vibration and Wear Particle Analysis Both wear debris and vibration analysis techniques were used to assess the gearbox condition and diagnose problems during the three tests. The results from wear debris analysis of Test No. 1 indicate a normal condition with a slightly high number of wear particles due to roughening gear surfaces near the end of the test.
In Test No. 2, both methods discovered the lack of lubrication problem between the gear surfaces, although the wear particle analysis gave a more conclusive result. The presence of severe sliding particles from metal-to-metal sliding is a good indicator of inadequate lubrication.
Wear debris analysis of Test No. 3 found a large number of wear particles with a relatively smooth surface. Because iron powder was involved in the wear process and its morphology was modified, the wear process may be called a three-body rubbing wear process. In contrast to normal three-body wear processes, which include hard contaminants such as sand, the three-body wear process in this study did not generate cutting particles associated with cutting wear. It did, however, generate significant wear debris. The iron particles accelerated the wear process. Vibration analysis confirmed the wear process due to the increase in the peak at the shaft running speed, and the presence of a mound of energy near the bearing frequency.
Conclusion
These promising tests are a first effort at showing what many practitioners of oil analysis have come to know from experience in the plant. Wear particle analysis and vibration analysis are highly complementary. They reinforce indications seen in each technology, and have unique diagnostic strengths in highlighting specific wear conditions. Wear debris analysis provided further insight on the wear rate and gear mechanism, while vibration analysis provided quick and reliable information on bearing condition. Integration of these two condition-monitoring techniques in all three worm gearbox tests provided comprehensive insight into the true operating condition of the test rig under controlled experimental conditions. Future planned research is expected to uncover even more detail in the relationship between the two technologies during active machine faults, and examples from some of the many other wearing components that are commonly encounter. POA
References
Anderson, D. (1982). Wear Particle Atlas (revised edition). Report NAEC-92-163. Barron, T. (1996). Engineering Condition Monitoring. Boston: Addison Wesley Longman. Berry, J. (1999, November-December). Good Vibes about Oil Analysis. Practicing Oil Analysis. Byington, C., Merdes, T. and Kozlowski, J. (1999). Fusion techniques for vibration and oil debris/quality in gearbox failure testing. Proceedings of the International Conference on Condition Monitoring. University College of Swansea, Swansea, UK. pp. 113-128. Hunt, T. (1996). Condition Monitoring of Mechanical and Hydraulic Plant: A Concise Introduction and Guide. Norwell, Mass: Kluwer Academic Publishers. Luo, G., Osypiw, D. and Irle, M. (2000). Real-time condition monitoring by significant and natural frequencies analysis of vibration signal with wavelet filter and autocorrelation enhancement. Journal of Sound and Vibration 236. Mathew, J. and Stecki, J. (1987). Comparison of vibration and direct reading ferrographic techniques in application to high-speed gears operating under steady and varying load conditions. Journal of the Society of Tribologists and Lubrication Engineers 43. pp. 646-653. Maxwell, H. and Johnson B. (1997). Vibration and lube oil analysis in an integrated predictive maintenance program. Proceedings of the 21st Annual Meeting of the Vibration Institute. pp. 117-124. Newell, G. (1999). Oil Analysis-Cost Effective Machine Condition Monitoring Technique. Condition Monitoring ’99 387. Optimas Technical Reference (9th edition) (1999). Media Cybernetic. Roylance B., Williams J. and Dwyer-Joyce R (2000, February 7). Wear Debris and Associated Wear Phenomena – Fundamental Research and Practice, Proceedings of the I MECH E Part J Journal of Engineering Tribology 214. pp. 79-105. Toms, L. (1998). Machinery Oil Analysis: Methods, Automation and Benefits (2nd edition). Virginia Beach, Va: Coastal Skills Training. Troyer, D. and Williamson, M. (1999). Effective integration of vibration analysis and oil analysis, Proceedings of the International Conference on Condition Monitoring, University College of Swansea, Swansea, UK. pp. 411-420. Want, W. and McFadden, P. (1996). Application of wavelets to gearbox vibration signals for fault detection. Journal of Sound and Vibration 192. pp. 927-939.
Related Articles
The Lubrication Requirements of Couplings

The Building Blocks to Creating an Effective Lubrication Program
Principles of Insulation Testing

Does Lubrication Belong in the CMMS?
Top Tips for Selecting Pressure Measurement Transmitters
Gearbox Diagnostics Fault Detection
